Untangling your Logic using State Machines

You may find this article useful if:
- You can read JS / Object oriented languages (Python, C++, C#, Java, etc)
- You are familiar with writing functions (https://stackoverflow.com/a/4709224)
Introduction
A few weeks ago, I was working on an application where I had to control a button's visibility. From the moment I started, I knew the following things:
- My button could be either visible or invisible.
- If any key was pressed while my button was invisible, it would become visible.
- When my button became visible, a 3-second timer would start.
- If the timer expired, the button would then become invisible.
- if a key was pressed while my button was visible, the timer would restart.
We could explain this logic using the following diagram:
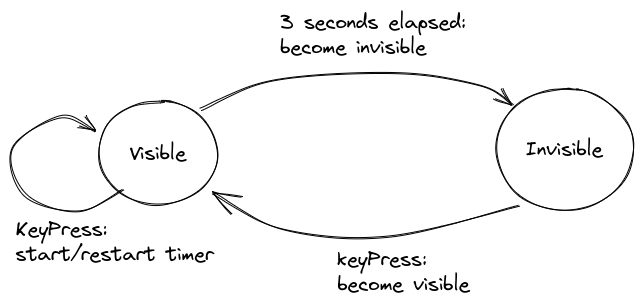
I decided it was good enough, so I started coding right away. My code looked something like this:
// Code simplified for explanation purposes
function onKeyPress() {
  if(button.visible) {
    restartTimer();
  } else {
    button.visible = true;
  }
}

function restartTimer() {
  if(timer.exists) {
    timer.delete();
  }

  timer = new Timer("3 seconds");
  if(timer.elapsed) {
      button.visible = false;
  }
}
I wasn't really feeling the result. My beautiful button was popping in and out of the screen without much of a transition or animation. I knew the designers in my team wouldn't be happy with my work, so I decided to add some fanciness to my work. I opted for a 1s opacity transition, then got back into coding. I ended with something like this:
// Code simplified for explanation purposes
function onKeyPress() {
  if(button.visible) {
    restartTimer();
  } else {
    // Wait for transition to complete.
    waitTransition("1 second", "opacity=1")
    button.visible = true;
  }
}

function restartTimer() {
  if(timer.exists) {
    timer.delete();
  }

  timer = new Timer("3 seconds");
  if(timer.elapsed) {
    waitTransition("1 second", "opacity=0")
      button.visible = false;
  }
}
Yet, this introduced a new bug to my code. Can you spot it? Try going back to the code and see if you can find it.
Did you spot it? Don't worry if not! It took me some time to find it. Here's a clue: What would happen if you pressed a key while a transition is happening? Since you pressed a key, the timer should restart and button's opacity should go back to 1.
Where should I add this? I decided to add a new isFadingOut property to my button, so my code now looked like this:
// Code simplified for explanation purposes
function onKeyPress() {
  if(button.isFadingOut) {
    waitTransition("1 second", "opacity=1");
    button.visible = true;
  }
  else if(button.visible) {
    restartTimer();
  } else {
    // Wait for transition to complete.
    waitTransition("1 second", "opacity=1")
    button.visible = true;
  }
}

function restartTimer() {
  if(timer.exists) {
    timer.delete();
  }

  timer = new Timer("3 seconds");
  if(timer.elapsed) {
    // Wait for transition to complete.
    button.isFadingOut = true;
    waitTransition("1 second", "opacity=0")
    button.isFadingOut = false;
      button.visible = false;
  }
}
This ended up creating a new list of bugs, most of them caused by a race condition. This was getting out of hand! Now I had to deal with several timers at the same time. What if I had to add a new fadingIn state? How much would that mess up my code? I decided it was time to change the way I approached the problem.
State Machines save the day.
You may have noticed that the opacity transition created a new element in our diagram:
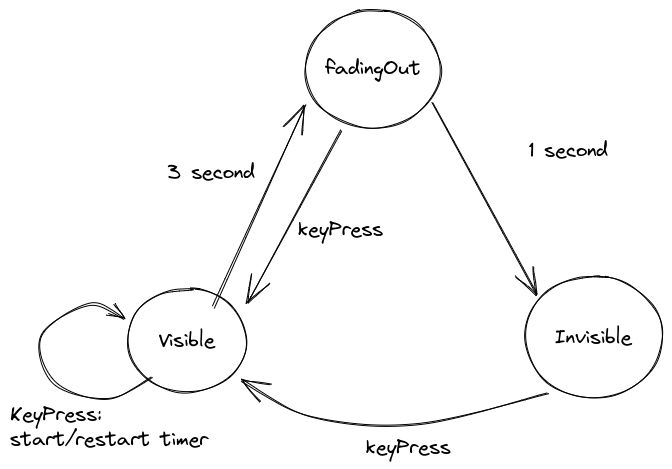
This diagram represents a State Machine. It is one of the ways how one can be drawn. State machine are a great tool to visualize all the states and transitions in our application. Every circle represents a state, while every arrow is a transition between states. They also help us see all the different inputs needed for a transition between states to happen. All in all, they are a great way to untangle almost any sort of boolean mess
This is all great but, how do I use them?
One of the ways in which we can implement a State Machine is using enumerators. They don't exist in JavaScript natively, but we can simulate one using an object:
const buttonStates = {
  // You could also map these to a number instead of the same string,
  // but this is personal preference as it's easier to debug.
  fadingOut: "fadingOut",
  visible: "visible",
  invisible: "invisible"
};
We can then store the current state of our button in a property:
// start with a default state
button.state = buttonStates.visible;
We'll need to add a new function in charge of transitioning between states:
function changeState(newState) {
  button.state = newState;

  if(newState === buttonStates.visible) {
    clearTransitions();
    waitTransition("1 second", "alpha=1");
    restartTimer();
  }

  if(newState === buttonStates.fadingOut) {
    waitTransition("1 second", "alpha=0")
  }
}
Finally, we need to adapt both our previous functions to take our new state into account:
function onKeyPress(){
  if(button.state === buttonStates.visible) {
    restartTimer();
  }

  if(button.state === buttonStates.invisible) {
    changeState(buttonStates.visible)
  }

  if(button.state === buttonStates.fadingOut) {
      changeState(buttonStates.visible)
  }
}

function restartTimer() {
  if(timer.exists) {
    timer.delete();
  }

  timer = new Timer("3 seconds");
  if(timer.elapsed) {
    changeState(buttonStates.fadingOut)
  }
}
This is not only easier to debug, but it also makes it simpler to add new States to our button. As an example, you could add a new fadingIn state by:
- Adding it to our enumerator
- Adding a new if statement both in
changeStateandrestartTimer.
Once this is done, you may notice this logic won't easily clash with what we previously did. Every state has a different behaviour that is split into its own block.
When do I use them?
As I mentioned, State machines are a great tool for several use cases. They are implemented in day-to-day tools and can be seen in modern libraries such as xstate. However, they shouldn't always be used. There are some cases where a State Machine may even make our logic more complicated. Here's a list of pros and cons I've found while working with them:
Pros:
- They make apps easier to debug, by separating each state into its own block
- It's easy to add new states into your application
- They make your code easier to read.
Cons:
- They have a learning curve, people who are not familiar with them may find them confusing.
- Not the best way to implement that on-off button you're working on.
Learn more about State Machines
Using enums and if/else statements is not the only way to create a state machine. This is only one of the approaches you can take to do it. Here's a list of places where you can learn more about them:
- Finite-state machines on Wikipedia
- XState's docs
- State machines in game development
- This great explanation I found on Stackoverflow while writing this article
Hey! Thank you for reading my article. If you learned something new or enjoyed my daily dev struggles, please follow me on Twitter: @robruizrdevs.
See you soon! :)
About the author
Hello! I'm Roberto, a Mexican Web developer. My content is mostly focused around JavaScript / React related things.
Recently, I rediscovered my passion for teaching. I love doing both written and video content.
You can easily find me hanging on Twitter!
Comments
Join the discussionGreat work ! It's always interesting to try implementing a pattern from scratch before switching to a fully fledged library like Xstate.
It got me thinking, I think you could take it one step further, while still avoiding any third-party dependency. Right now your changeState doesn't guarantee that you machine will be executed as described by your diagram.
For example nothing prevents you from calling changeState('fadeOut') from the state invisible which shouldn't be possible.
This could be solved by implementing the transition function from the mathematical defintion
Something like that :
First you'd add the transition to your state defintion
const buttonStates = {
  // You could also map these to a number instead of the same string,
  // but this is personal preference as it's easier to debug.
  fadingOut: {
    show: "visible",
    hide: "invisible"
  },
  visible: {
    reset: "visible",
    fade: "fadingOut"
 },
  invisible: "{
    show: "visible"
  }
};
Then the transition function could be defined like so:
 const transition = (state, event) => {
    return buttonStates[state][event]
}
Which would allow you to call transition(button.state, "fade")
Might be overkill for your use case, but thought it was worth mentioning :)
This was so informative! Love it!
Hey Rizel! Thank you! These sorts of comments inspire me a lot 😄
Loved it! I learned a lot here
That was a nice read Roberto Ruiz! I liked how you walked us through the problem and the solution.
Thank you!! Happy that you liked it :)
Thank you!! I'm glad you did :)

